
To clean the Sailnovo 2 in 1 pasta maker, let dough dry slightly, then brush and wipe every accessible area. Never immerse the machine in water or place it inside a dishwasher, because moisture can cause rust and mechanical damage.
The sailnovo 2 in 1 pasta maker machine typically offers 9 thickness settings and two cutting widths. Those features create more roller and cutter surfaces that need careful dry cleaning after every batch.
Cleaning becomes much easier when you remove flour before it mixes with moisture and forms stubborn residue. With the right routine, most post-pasta cleanup takes only a few careful minutes.
Key Takeaways
- Never rinse the Sailnovo pasta maker under running water.
- Never place the machine or cutter assembly inside a dishwasher.
- Let stubborn dough firm slightly before attempting removal.
- Use a soft brush, dry cloth, wooden stick, or toothpick carefully.
- Clean roller gaps and cutters without forcing tools between moving parts.
- Store the machine completely dry in a low-humidity location.
Why Sailnovo Requires Dry Cleaning
The Sailnovo uses metal rollers, cutters, and internal mechanical components that do not need water for routine cleaning. Instead, the manufacturer guidance emphasizes dry brushing and wiping after use.
Water creates unnecessary exposure around seams, shafts, and cutting mechanisms. Therefore, avoiding immersion protects against moisture-related corrosion while keeping the mechanical parts operating smoothly.
The machine also contains narrow spaces where flour and dough can collect. Consequently, careful brushing works better than aggressive washing for reaching accessible residue.
What You Need Before Cleaning
You do not need expensive cleaning products for routine Sailnovo maintenance. A few simple kitchen tools can remove most flour and dough without damaging the machine.
- Soft, dry cleaning brush
- Clean microfiber or cotton cloth
- Wooden toothpick or wooden stick
- Dry paper towel
- Small container for removable accessories
Choose tools with soft edges whenever possible, especially around rollers and cutters. Avoid metal picks, knives, abrasive pads, and other objects that can scratch surfaces.
How To Clean the Sailnovo Pasta Maker Step by Step
1. Finish the Pasta-Making Session
Complete your final sheet or noodle batch before beginning the cleaning process. Then move the machine away from loose flour and fresh dough on your work surface.
Do not immediately wipe sticky dough while it remains soft and elastic. Allow residue to dry slightly, because firmer dough usually separates more easily from the metal surfaces.
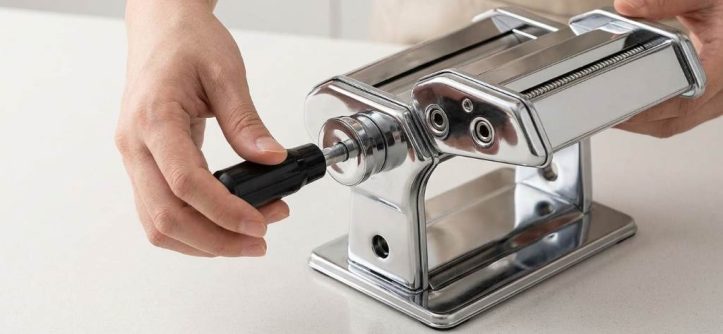
2. Remove the Hand Crank
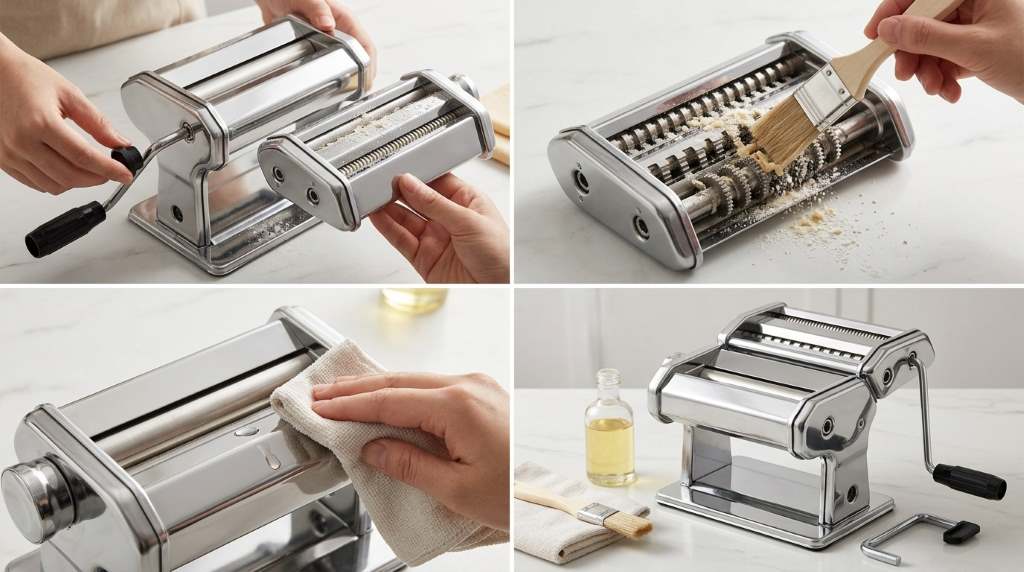
Take the hand crank out of the machine before cleaning the roller and cutter areas. Removing the crank gives you better access and prevents accidental movement during brushing.
Place the crank somewhere clean and dry while you work. If flour remains on it, wipe it with a dry cloth before storage.
3. Brush Away Loose Flour
Start with the easiest residue by brushing loose flour from the exterior and accessible roller surfaces. Work gently around the machine instead of pushing flour deeper into openings.
A soft brush works particularly well because it lifts dry particles without scratching metal surfaces. Continue until loose flour no longer falls from the machine during light brushing.
4. Clean the Rollers Carefully
Inspect the smooth rollers for dried dough, flour buildup, and small fragments. Brush across the roller surfaces while turning them carefully when necessary.
Never force your fingers between moving rollers during cleaning. Instead, rotate the mechanism gradually and clean each accessible section with your brush.
If dough remains attached, wait slightly longer for it to firm up. Then gently loosen the residue with a wooden stick or toothpick.
5. Clean the Pasta Cutters
The cutters deserve extra attention because narrow cutting channels can trap dough fragments. Use a soft brush to remove loose material from the cutter openings.
For stubborn pieces, use a wooden toothpick with controlled pressure. Work from the outside toward the accessible opening rather than forcing anything deeply inside.
Never use a kitchen knife to scrape cutter teeth or roller edges. A sharp tool can scratch the metal and create unnecessary damage around delicate areas.
6. Check the Underside
Flour and dough can collect beneath the smooth rollers during repeated passes. Therefore, inspect the underside after cleaning the visible surfaces.
Use a dry paper towel or small brush to remove accessible residue. Do not push cloth deep between the rollers because loose fibers can become trapped.
7. Wipe the Exterior
After brushing, wipe the machine exterior with a clean, dry cloth. This removes the fine flour film that brushing may leave behind.
Pay attention to the adjustment knob, frame, clamp area, and exposed metal surfaces. Keep the final wipe dry rather than using a wet kitchen towel.
8. Inspect Before Storage
Finally, examine the rollers and cutters under good lighting. Look for remaining dough fragments, flour deposits, or moisture before putting the machine away.
If everything looks clean and dry, reinstall the accessories as appropriate. Store the machine in a dry location where humidity remains low.
How To Remove Stubborn Dried Dough
Old dough can become surprisingly hard after several hours, especially inside narrow cutter openings. Trying to remove it with excessive force can create more problems than the residue itself.
First, brush away everything loose around the affected area. Next, use a wooden toothpick to gently break the dried piece into smaller fragments.
Afterward, brush the fragments away instead of pushing them farther inside. Repeat the process until the affected area becomes visibly clear.
For particularly stubborn buildup, patience works better than moisture. The goal involves loosening the dough mechanically without introducing water into the machine.
Can You Wash a Sailnovo Pasta Maker With Water?
No, you should not wash the Sailnovo pasta maker with water or immerse it. Routine cleaning should rely on dry brushing, dry wiping, and careful removal of dried dough.
Water can remain around mechanical joints and metal components after washing. Over time, trapped moisture can contribute to corrosion and affect the machine’s working condition.
Likewise, avoid placing the machine inside a dishwasher. Dishwasher heat, water exposure, detergent, and prolonged moisture can create unnecessary risks for this type of manual appliance.
Can You Use Soap or Kitchen Cleaner?
Routine cleaning does not require soap, detergent, or household kitchen cleaner. Dry cleaning remains the safer approach for removing normal flour and dough residue.
Cleaning chemicals can also leave unwanted residue around food-contact surfaces. Therefore, avoid introducing unnecessary liquids when a dry brush already solves the problem.
If the exterior needs special attention, follow the specific care instructions supplied with your version. Different Sailnovo models can have slightly different construction details.
Common Cleaning Mistakes To Avoid
| Mistake | Why It Causes Problems | Better Approach |
|---|---|---|
| Rinsing with water | Moisture can reach metal and mechanical areas. | Use dry brushing and wiping. |
| Using a dishwasher | Heat and moisture can damage components. | Clean manually with dry tools. |
| Scraping with a knife | Sharp edges can scratch or damage surfaces. | Use a wooden stick or toothpick. |
| Cleaning soft dough immediately | Sticky dough can smear across more surfaces. | Let residue dry slightly first. |
| Pushing cloth between rollers | Fabric can become trapped inside moving parts. | Use a soft brush instead. |
| Ignoring cutter gaps | Small dough fragments can accumulate over time. | Inspect and brush cutter openings. |
| Storing while damp | Remaining moisture can encourage corrosion. | Confirm every accessible surface stays dry. |
How To Prevent Dough From Sticking
Good cleaning starts before the dough reaches the machine. A firm, properly prepared dough creates less residue and makes post-use maintenance significantly easier.
Lightly flour the dough before rolling when appropriate for your recipe. However, avoid excessive flour because unnecessary buildup can increase cleanup around the rollers.
Also, avoid feeding unusually wet dough through the machine. Sticky dough can enter narrow cutter spaces and make the next cleaning session considerably harder.
Use the Correct Dough Consistency
Your dough should feel firm and manageable rather than wet and adhesive. If it sticks aggressively to your fingers, adjust the dough consistency before continuing.
Additionally, work with manageable dough portions rather than forcing large pieces through the rollers. Controlled portions reduce mess and provide more consistent sheets.
What To Do If Dough Keeps Appearing After Cleaning
Finding a few crumbs after the first pass does not necessarily mean the machine remains dirty. Flour and dried dough can hide around roller edges and cutter channels.
Start another inspection under brighter lighting and rotate the rollers carefully. Then brush the newly exposed areas and wipe the exterior again.
If residue continues appearing, check the underside and cutter openings. These areas often receive less attention during a quick cleanup.
When Should You Clean the Sailnovo Pasta Maker?
Clean the machine after every pasta-making session rather than allowing residue to accumulate. Frequent dry cleaning requires less effort than removing several days of hardened dough.
Perform a deeper visual inspection whenever you use the machine after extended storage. This simple check can reveal old flour, dried dough, or early signs of moisture exposure.
Before long-term storage, give every accessible surface a careful dry cleaning. Then keep the machine and accessories together somewhere dry and protected.
How To Store the Machine After Cleaning
Storage affects cleanliness almost as much as the cleaning process itself. A clean machine can still develop problems if you leave it in a humid environment.
Choose a dry cabinet or pantry with limited exposure to steam and splashing water. Keep the pasta maker away from sinks, dishwashers, and areas where cooking moisture regularly accumulates.
Store the crank and accessories with the machine whenever possible. Keeping everything together also reduces the chance of losing small components between pasta sessions.
A Five-Minute Post-Pasta Cleaning Routine
For regular use, you can simplify the entire process into a repeatable routine. This approach prevents cleaning from becoming a large kitchen chore.
- Remove the hand crank and loose accessories.
- Let sticky dough dry slightly.
- Brush flour and residue from the rollers.
- Clean cutter openings with a soft brush.
- Remove stubborn fragments using a wooden toothpick.
- Wipe accessible exterior surfaces with a dry cloth.
- Inspect the machine for remaining residue.
- Store everything in a clean, dry location.
Consistency matters more than complicated cleaning products. A short routine after every session keeps residue from becoming difficult buildup.
Signs Your Cleaning Routine Needs Improvement
Frequent dough flakes appearing during the next pasta session indicate incomplete previous cleaning. Similarly, visible flour around cutter openings suggests that those areas need closer inspection.
Rust spots deserve immediate attention because they can indicate repeated moisture exposure. Review your cleaning method and storage environment before using the machine again.
Unusual resistance during cranking can also justify inspection. Remove accessible residue first, then check whether the mechanism moves normally without forcing it.
Cleaning Checklist
| Cleaning Area | Recommended Method | Avoid |
|---|---|---|
| Rollers | Soft dry brush and cloth | Water and sharp tools |
| Cutter openings | Brush and wooden toothpick | Knives and metal picks |
| Machine exterior | Dry cloth | Soaking |
| Hand crank | Dry wipe | Leaving wet after cleaning |
| Underside | Brush accessible residue | Forcing fabric between rollers |
| Storage area | Dry cabinet or pantry | Humid locations |
Frequently Asked Questions
Can I rinse the Sailnovo pasta maker under a faucet?
No, avoid rinsing the machine because water can enter mechanical areas and encourage corrosion.
Can I put the Sailnovo pasta maker in a dishwasher?
No, the machine should not go into a dishwasher because heat and moisture can damage its components.
What removes dried dough from the cutters?
A soft dry brush followed by a wooden toothpick can carefully remove stubborn dried dough.
Should I clean the machine after every use?
Yes, cleaning after every pasta session prevents flour and dough from accumulating inside difficult-to-reach areas.
Can I use a wet cloth on the Sailnovo machine?
Routine maintenance should use a dry cloth rather than introducing moisture around the rollers and mechanical components.
Final Verdict
The safest way to clean the Sailnovo 2 in 1 pasta maker involves dry cleaning after every use. Let sticky residue firm slightly, brush away flour, clean cutter openings carefully, and wipe the exterior.
Most importantly, keep water, dishwashers, knives, and aggressive scraping away from the machine. Following this simple routine helps preserve the rollers, cutters, mechanical movement, and overall condition.
Use the cleaning checklist after your next pasta session and make it part of your regular workflow. A few careful minutes after cooking can prevent much harder maintenance later.



Leave a Reply