
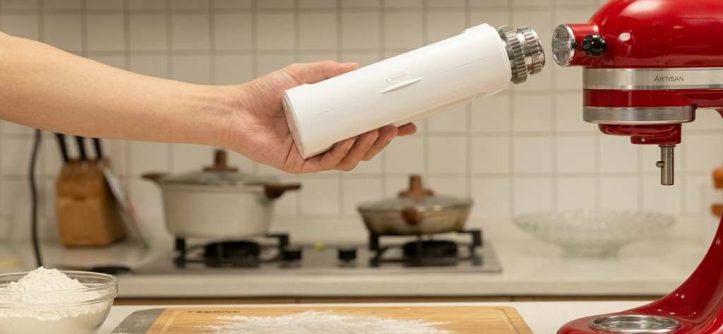
The Antree 3-in-1 attachment turns a KitchenAid stand mixer into a practical pasta station. It combines sheet rolling, spaghetti cutting, and fettuccine cutting in one powered attachment.
With eight thickness settings and a 5.5-inch rolling width, it offers useful control for homemade pasta. However, dough consistency and correct setup matter more than speed for reliable results.
For a closer look at the antree pasta maker attachment 3 in 1 set, start with compatibility. Then follow the preparation, rolling, cutting, and cleaning steps below.
Key Takeaways
- Confirm your KitchenAid mixer model before attaching the pasta maker.
- Prepare firm, smooth dough before feeding it through the rollers.
- Start rolling at the widest setting and reduce thickness gradually.
- Dust dough lightly when sticking develops during rolling or cutting.
- Use the integrated cutter selection for spaghetti or fettuccine.
- Keep the attachment dry and remove dough residue after every session.
What Does the Antree 3-in-1 Attachment Do?
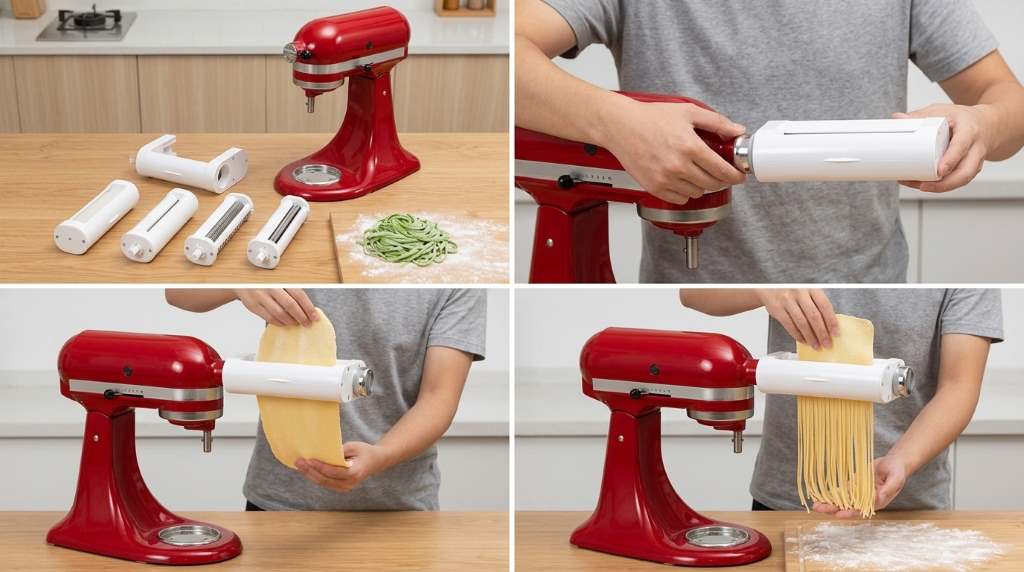
The attachment combines three pasta functions into one compact unit for KitchenAid stand mixers. You can roll pasta sheets, cut spaghetti, or produce fettuccine without swapping separate attachments.
This integrated design simplifies the workflow, especially when making several batches. Instead of repeatedly changing accessories, you can move directly from rolling toward cutting.
Understanding the Three Functions
- Pasta roller: Flattens dough into progressively thinner sheets.
- Spaghetti cutter: Cuts sheets into narrow pasta strands.
- Fettuccine cutter: Creates wider ribbons for sauces and baked dishes.
The roller handles the first stage, while either cutter handles the finishing stage. Therefore, understanding each function prevents unnecessary attachment changes during preparation.
Check Compatibility Before You Begin
First, verify that your stand mixer accepts the Antree attachment before preparing dough. The manufacturer lists compatibility with KitchenAid stand mixers, except the K45SS model.
Also, check your mixer manual if you own an unusual or older model. A secure connection helps prevent wobbling, slipping, or inconsistent roller performance during use.
What You Need Nearby
- Antree 3-in-1 pasta attachment
- Compatible KitchenAid stand mixer
- Prepared pasta dough
- Extra flour for light dusting
- Knife or bench scraper
- Drying rack or clean tray
- Cleaning brush
Set everything within reach before switching on the mixer. This preparation keeps your hands focused on guiding the pasta safely.
Prepare Pasta Dough for the Attachment
Good pasta starts with dough that feels firm, smooth, and workable. Dough that feels excessively wet can stick inside the rollers and cutters.
Conversely, extremely dry dough can crack instead of forming flexible sheets. Therefore, adjust flour or liquid gradually until the dough becomes cohesive.
A Practical Dough Texture Test
Press the dough gently with one finger before rolling it. It should feel firm while remaining pliable enough to knead without cracking.
Next, knead until the surface becomes relatively smooth and elastic. Let the dough rest before rolling so the gluten can relax.
Then divide the dough into manageable portions rather than feeding one enormous piece. Smaller portions provide better control and reduce unnecessary pressure on the rollers.
How to Attach the Antree Pasta Maker
Turn the stand mixer off before installing or removing the attachment. This simple step prevents accidental movement while you work near moving components.
Insert the attachment into the mixer’s front accessory hub according to the included instructions. Tighten the attachment knob enough to keep the unit firmly positioned.
Next, place your prepared dough beside the mixer. Keep your hands, loose clothing, and utensils away from moving rollers during operation.
How to Roll Pasta Sheets
Step 1: Flatten the Dough
Flatten each dough portion into a manageable rectangle before feeding it through the roller. Keep the width reasonably aligned with the roller opening.
Start with the widest thickness setting rather than forcing thick dough through a narrow gap. This first pass creates a more workable sheet.
Step 2: Make the First Pass
Turn the mixer on at a suitable low operating speed recommended by your instructions. Feed the dough steadily into the roller without pushing it aggressively.
Catch the emerging sheet with your free hand. Avoid pulling sharply because tension can distort the developing pasta sheet.
Step 3: Fold and Repeat
Fold the sheet when necessary, then pass it through the widest setting again. Repeat this process until the dough becomes smooth and uniform.
Use a light dusting of flour whenever the surface becomes noticeably sticky. Avoid excessive flour because it can make finished pasta tougher.
Step 4: Reduce the Thickness
Move gradually toward thinner settings as the sheet becomes smoother. Avoid jumping immediately from thick dough to the thinnest setting.
Different recipes need different thicknesses depending on the final pasta style. Thinner sheets work well for delicate pasta, while thicker sheets provide more structure.
How to Cut Spaghetti
Once your sheet reaches the desired thickness, select the spaghetti cutting function. Guide the sheet smoothly into the cutting section without bunching the dough.
Catch the emerging strands with your other hand as they leave the cutter. Then separate the strands gently before placing them on a floured surface.
If the strands stick together, add a small amount of flour and separate them carefully. Excessive moisture usually causes more sticking than the cutter itself.
How to Make Fettuccine
Prepare another sheet using the roller before selecting the fettuccine cutting function. Keep the sheet even because uneven thickness can produce inconsistent ribbons.
Feed the sheet steadily and support the emerging pasta as it exits. Afterward, dust the ribbons lightly and arrange them loosely.
Fettuccine pairs especially well with creamy, tomato-based, mushroom, and meat sauces. Fresh ribbons also cook quickly, so prepare your cooking water before cutting.
How to Make Lasagna Sheets
You do not need to send every pasta sheet through a cutter. Instead, roll the dough to your preferred thickness and cut suitable lengths manually.
Keep the sheets separated with light flour dusting before stacking them. This approach creates broad pasta pieces without adding another attachment.
How to Prevent Common Pasta Problems
Dough Sticks to the Rollers
Sticky dough usually contains too much moisture or lacks sufficient surface flour. Pause the process and dust the dough lightly before continuing.
Do not bury the dough under flour because excessive flour changes the final texture. Instead, make small adjustments until the sheet moves cleanly.
Dough Cracks During Rolling
Cracking often indicates dough that feels too dry or insufficiently rested. Let the dough rest longer and adjust its hydration carefully.
Also, avoid forcing a thick piece through a narrow setting. Return to a wider setting and reduce thickness more gradually.
Pasta Strands Stick Together
Freshly cut pasta can stick when the dough carries too much moisture. Lightly dust the sheet before cutting and separate strands immediately afterward.
Spread finished strands loosely across a drying rack or clean surface. Crowding allows moisture to collect between strands and encourages clumping.
Pasta Cuts Unevenly
Uneven cutting often begins with an inconsistent sheet rather than the cutter. Roll the dough evenly before attempting the final cut.
Feed the sheet steadily and avoid twisting it during entry. Consistent handling helps maintain uniform pasta width from beginning to end.
Cleaning the Antree Attachment Correctly
Cleaning deserves attention because dried dough can become difficult to remove from moving parts. Let residue dry before brushing it away whenever practical.
The attachment should not go into a dishwasher or become submerged in water. Instead, follow the dry-cleaning approach recommended for the attachment.
Simple Cleaning Routine
- Turn off and unplug the mixer.
- Remove the attachment carefully.
- Allow remaining dough to dry.
- Brush away dried particles.
- Inspect rollers and cutters for residue.
- Store the attachment in a dry location.
Never use water as your first cleaning method on the attachment. A dry brush provides better control around the rollers and cutting mechanisms.
Safety Practices That Matter
Keep fingers away from the rollers and cutters whenever the mixer operates. Never use your fingers to push dough into moving mechanisms.
Keep sleeves, jewelry, towels, and utensils away from moving components. Always switch off and unplug the mixer before removing or adjusting the attachment.
Children should not operate the attachment without appropriate adult supervision. A powered roller can catch loose material quickly, making safe handling essential.
How to Get Better Results Every Time
Consistency improves when you treat pasta making as a controlled process rather than a speed challenge. Prepare uniform dough portions and repeat the same rolling sequence.
Keep a small amount of flour nearby, but use it sparingly. Also, maintain a clear workspace so you can guide long pasta sheets without interruption.
- For beginners: Practice with wider sheets before attempting very thin pasta.
- For spaghetti: Keep sheets smooth and moderately dry before cutting.
- For fettuccine: Maintain consistent sheet thickness for uniform ribbons.
- For lasagna: Roll sheets evenly and trim them after rolling.
- For repeated batches: Clean loose dough between batches before residue hardens.
What Competitor Guides Often Miss
Many pasta attachment guides focus mainly on assembly and basic operation. They often overlook dough behavior, thickness transitions, cleaning restrictions, and cutting problems.
A better workflow connects each stage because pasta quality depends on the previous stage. For example, poor rolling can create cutting problems that look like cutter defects.
Another overlooked point involves choosing the correct pasta thickness for the intended dish. The thinnest setting does not automatically produce the best pasta for every recipe.
When Should You Use Each Pasta Setting?
| Pasta Goal | Recommended Approach | Key Tip |
|---|---|---|
| Spaghetti | Roll, then use spaghetti cutter | Separate strands immediately |
| Fettuccine | Roll, then use fettuccine cutter | Keep sheet thickness consistent |
| Lasagna | Roll and cut sheets manually | Prevent sheets from sticking |
| Thin pasta | Reduce thickness gradually | Avoid forcing dough through narrow settings |
Storage Tips for Long-Term Performance
Dry the attachment completely before storing it after cleaning. Choose a clean cabinet where flour dust and moisture remain minimal.
Keep the cleaning brush with the attachment so maintenance stays convenient. Organized storage also prevents accidental impacts against other heavy kitchen equipment.
Final Verdict
The Antree 3-in-1 attachment works best when you control dough texture, thickness, and feeding speed. Its integrated roller and cutters make fresh spaghetti and fettuccine more convenient.
For the best results, begin with properly rested dough and use gradual thickness changes. Clean the attachment carefully afterward and keep moisture away from its internal components.
If you already own a compatible KitchenAid mixer, this attachment can simplify your homemade pasta routine. Follow the steps above, practice with one batch, and refine your thickness preferences.
Frequently Asked Questions
Can I use the Antree 3-in-1 attachment with any KitchenAid mixer?
It works with KitchenAid stand mixers except the K45SS model listed as incompatible.
What pasta does the Antree 3-in-1 attachment make?
It rolls pasta sheets and cuts them into spaghetti or fettuccine.
Can I make lasagna with this attachment?
Yes, roll the dough into sheets and cut suitable lengths manually.
Can I wash the Antree pasta attachment in a dishwasher?
No, keep the attachment out of the dishwasher and avoid submerging it in water.
Why does my pasta stick during cutting?
Excess moisture usually causes sticking, so lightly flour the dough and separate strands promptly.




Leave a Reply