There’s something magical about the smell of fresh pasta dough being rolled out in the kitchen. Homemade pasta tastes richer, feels more satisfying, and brings a sense of accomplishment that store-bought versions simply can’t match. If you own a KitchenAid stand mixer, you already have the perfect tool to make pasta from scratch with ease.
I remember the first time I tried making pasta at home. It was a messy, flour-covered disaster, but the taste was worth every bit of the cleanup. Once I discovered the kitchenaid pasta attachment guide, everything changed. The process became smoother, faster, and far more enjoyable. This guide will walk you through everything you need to know to make perfect homemade pasta using your KitchenAid attachments.
Why Use KitchenAid Attachments for Homemade Pasta
Making pasta from scratch can seem daunting, but KitchenAid attachments simplify the process. These attachments turn your stand mixer into a pasta-making machine, allowing you to roll, cut, and shape dough with minimal effort. The result is consistently smooth, even pasta that cooks uniformly and tastes incredible.
According to a study by the Journal of Culinary Science & Technology, homemade pasta retains more nutrients and has a better texture compared to dried pasta. This is because fresh pasta doesn’t undergo the same processing and drying steps that can strip away flavor and nutritional value. With KitchenAid attachments, you can control the ingredients, ensuring your pasta is made with high-quality flour, eggs, and any other additions you prefer.
Additionally, making pasta at home allows you to experiment with flavors and shapes. You can create everything from classic spaghetti to intricate ravioli, all with the same tool. The attachments are also easy to clean and store, making them a practical addition to any kitchen.
Essential KitchenAid Attachments for Pasta Making
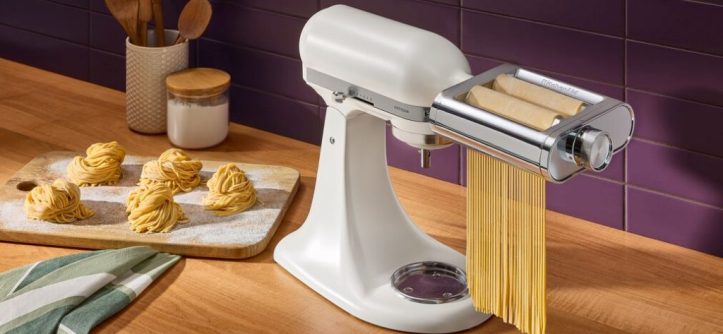
Pasta Roller Attachment
The pasta roller attachment is the foundation of your pasta-making journey. It flattens and thins the dough into smooth sheets, which you can then cut into your desired shape. The roller typically comes with multiple thickness settings, allowing you to adjust the dough from thick sheets for lasagna to paper-thin layers for delicate pasta like angel hair.
To use the roller, start with the widest setting and gradually decrease the thickness as you pass the dough through multiple times. This process ensures the dough is evenly rolled and prevents tearing. The roller attachment is also versatile—you can use it to make fresh dumpling wrappers, empanada dough, or even thin crusts for pies.
Pasta Cutter Attachments
Once your dough is rolled out, the pasta cutter attachments come into play. KitchenAid offers a variety of cutters, including spaghetti, fettuccine, and linguine. These attachments allow you to create uniform strands of pasta with ease. Simply feed the rolled dough through the cutter, and it will emerge as perfectly cut noodles.
For more variety, consider investing in a ravioli attachment. This tool helps you create evenly sized ravioli pockets, which you can fill with your favorite ingredients like cheese, spinach, or meat. The cutter then seals and cuts the ravioli, saving you time and ensuring a professional finish.
Pasta Press Attachment
If you prefer extruded pasta like penne, macaroni, or rigatoni, the pasta press attachment is a must-have. This tool forces the dough through a die, creating uniformly shaped pasta. The press is easy to use and allows you to experiment with different shapes and sizes.
The pasta press is particularly great for making pasta with whole wheat or alternative flours, which can be trickier to roll out by hand. It ensures a consistent texture and shape, making it ideal for beginners and experienced pasta makers alike.
Step-by-Step Guide to Making Homemade Pasta
Step 1: Prepare the Dough
Start with a simple pasta dough recipe. The classic ratio is 2 cups of all-purpose flour (or “00” flour for a more authentic texture) and 3 large eggs. Place the flour in a mound on a clean surface and create a well in the center. Crack the eggs into the well and gradually mix them into the flour using a fork or your hands.
Knead the dough for about 8–10 minutes until it becomes smooth and elastic. If the dough feels too dry, add a teaspoon of water. If it’s too sticky, add a bit more flour. Once the dough is ready, wrap it in plastic wrap and let it rest for at least 30 minutes. This resting period allows the gluten to relax, making the dough easier to roll out.
Step 2: Roll Out the Dough
Attach the pasta roller to your KitchenAid mixer. Set it to the widest setting and feed a small piece of dough through the rollers. Fold the dough in half and repeat the process two or three times to create a smooth, even sheet. Gradually decrease the thickness setting and pass the dough through again until it reaches your desired thinness.
For most pasta shapes, a medium thickness (around setting 4 or 5 on a 1–8 scale) works well. If you’re making lasagna or thick noodles, you can stop at a higher setting. For delicate pasta like angel hair, go thinner.
Step 3: Cut the Pasta
Once your dough is rolled out, it’s time to cut it. Attach your chosen pasta cutter to the KitchenAid mixer. Feed the sheet of dough through the cutter, and it will emerge as perfectly cut noodles. If you’re making ravioli, use the ravioli attachment to create pockets, fill them, and then seal and cut them.
For shapes like penne or macaroni, use the pasta press attachment. Load the dough into the press and extrude it through the die. Cut the extruded pasta into the desired lengths with a knife or the attachment’s built-in cutter.
Step 4: Cook or Store the Pasta
Fresh pasta cooks much faster than dried pasta—usually in just 2–4 minutes. Bring a large pot of salted water to a boil and add the pasta. Stir occasionally to prevent sticking, and test for doneness by tasting a strand. Fresh pasta is ready when it floats to the surface and has a tender, slightly chewy texture.
If you’re not cooking the pasta immediately, you can store it in the refrigerator for up to 24 hours or freeze it for later use. To freeze, lay the pasta in a single layer on a baking sheet, freeze until solid, and then transfer to an airtight container. This prevents the pasta from sticking together.
Tips for Perfect Homemade Pasta Every Time
Making pasta at home is a rewarding experience, but it can take some practice to get it just right. Here are a few tips to help you achieve the best results:
First, use the right flour. All-purpose flour works well for most pasta, but “00” flour (a finely ground Italian flour) creates a smoother, more tender texture. If you’re making whole wheat pasta, consider mixing it with all-purpose flour to avoid a dense, heavy result.
Second, don’t skip the resting period. Letting the dough rest allows the gluten to relax, making it easier to roll out and preventing it from shrinking back. If you’re in a hurry, you can rest the dough for as little as 20 minutes, but 30–60 minutes is ideal.
Third, keep your work surface and dough lightly floured to prevent sticking. However, avoid using too much flour, as it can make the pasta dry and tough. If the dough starts to dry out while rolling, lightly brush it with water to restore elasticity.
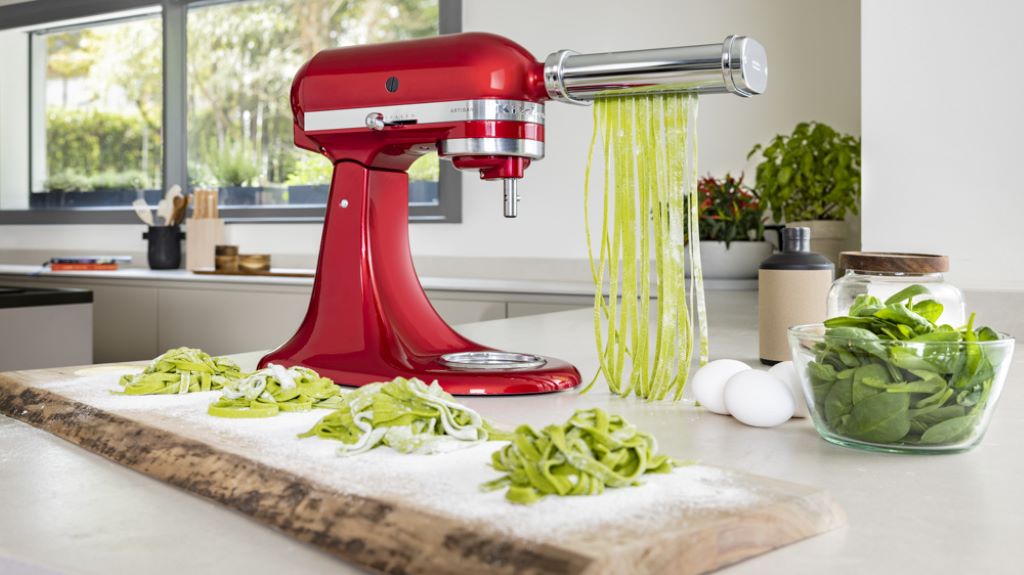
Finally, experiment with flavors. You can add ingredients like spinach, beetroot, or herbs to the dough for colored or flavored pasta. Just be sure to adjust the liquid content accordingly, as some additions may make the dough wetter or drier.
Common Mistakes to Avoid When Making Pasta
One of the most common mistakes is using too much flour when kneading the dough. While it’s important to prevent sticking, adding too much flour can make the pasta dry and brittle. Start with the recommended amount of flour and add more only if the dough is too sticky to handle.
Another mistake is rolling the dough too thin on the first pass. Always start with the widest setting on your pasta roller and gradually decrease the thickness. Rolling the dough too thin too soon can cause it to tear or stick to the rollers.
Additionally, avoid overworking the dough. Kneading is essential for developing gluten, but over-kneading can make the pasta tough. Once the dough is smooth and elastic, stop kneading and let it rest.
Lastly, don’t forget to salt your pasta water. Salt enhances the flavor of the pasta and helps it cook evenly. Use about 1–2 tablespoons of salt per gallon of water.
Personal Experience: My Journey to Perfect Pasta
My first attempt at making pasta was a humbling experience. I rolled the dough by hand, and it came out uneven and lumpy. The noodles were thick in some places and paper-thin in others, and they stuck together in a clumpy mess. Despite the imperfections, the taste was a revelation—fresh pasta has a richness and depth that dried pasta simply can’t match.
After that first try, I invested in KitchenAid pasta attachments, and the difference was incredible. The roller created smooth, even sheets of dough, and the cutters produced perfectly uniform noodles. I experimented with different shapes and flavors, from classic spaghetti to spinach-infused fettuccine. Each batch was better than the last, and I quickly fell in love with the process.
Now, making pasta is a weekend ritual in my home. My kids love helping with the rolling and cutting, and we all enjoy sitting down to a meal of fresh, homemade pasta. If you’ve been hesitant to try making pasta at home, I encourage you to give it a shot. The KitchenAid attachments make it easy, and the results are well worth the effort.
Conclusion
Making homemade pasta with KitchenAid attachments is a game-changer. It allows you to create restaurant-quality pasta in your own kitchen with minimal effort. By following the steps outlined in this guide and avoiding common mistakes, you’ll be well on your way to making perfect pasta every time.
If you’ve tried making pasta at home, share your favorite recipes or tips in the comments below. Or, if you’re new to pasta making, pass this guide along to a friend who might be interested in giving it a try. Here’s to many delicious, flour-covered adventures in your kitchen!
FAQs
Do I need a special flour to make pasta with KitchenAid attachments?
While all-purpose flour works well, “00” flour creates a smoother, more authentic texture. Whole wheat or alternative flours can also be used, but you may need to adjust the recipe.
Can I make gluten-free pasta with KitchenAid attachments?
Yes, you can use gluten-free flour blends, but the texture and elasticity may differ from traditional pasta. You may need to experiment with different blends and add xanthan gum or eggs for better binding.
How do I clean my KitchenAid pasta attachments?
Most attachments can be cleaned with warm, soapy water and a soft brush. Avoid using abrasive scrubbers, as they can damage the non-stick coating. Always dry the attachments thoroughly before storing them.
Can I use the pasta attachments for other recipes?
Yes, the pasta roller can be used to make dumpling wrappers, empanada dough, or even thin pie crusts. The pasta press can also be used for making homemade playdough or other dough-based recipes.
How long does fresh pasta last in the refrigerator?
Fresh pasta can be stored in the refrigerator for up to 24 hours. For longer storage, freeze the pasta in a single layer before transferring it to an airtight container. It will keep in the freezer for up to 3 months.


Leave a Reply