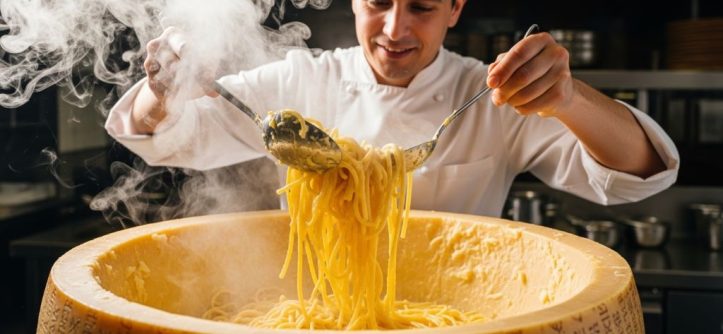
Cheese wheel pasta is one of the most dramatic and delicious dishes you can make at home. You may have seen it at a fancy Italian restaurant. A server rolls a giant wheel of Parmigiano-Reggiano to your table and tosses freshly cooked pasta inside the hollow center. The heat melts the cheese, coating every strand in a rich, nutty sauce. It looks impressive. However, the good news is that you can recreate this experience in your own kitchen.
This step-by-step guide will show you exactly how to do it. You will learn about the right ingredients, the tools you need, and the technique that makes the difference between a good dish and a great one. Therefore, whether you are cooking for a dinner party or just want to treat yourself, this guide has everything you need.
What Is Cheese Wheel Pasta?
Cheese wheel pasta, also known as pasta al formaggio in Italian, is a dish where cooked pasta is finished directly inside a hollowed-out wheel of aged cheese. The most commonly used cheese is Parmigiano-Reggiano. Some chefs also use Pecorino Romano or Grana Padano. Each cheese brings a slightly different flavor profile to the dish.
The process works because of heat. When hot pasta and a warm sauce are tossed inside the cheese wheel, the surface of the cheese begins to melt. As you stir, the melted cheese blends with the sauce to create a creamy, deeply savory coating. Additionally, the longer you work the pasta inside the wheel, the more cheese gets incorporated into the sauce.
This technique became famous through high-end Italian restaurants in cities like Rome and New York. However, it has since become a popular trend for home cooks who want to bring a touch of restaurant theater into their kitchens.
Ingredients You Will Need
Before you start cooking, you need to gather the right ingredients. Using quality ingredients is essential for this dish. The cheese wheel is the star of the show, so do not cut corners on it. Here is a complete list of what you will need.
For the Cheese Wheel
- One wheel of Parmigiano-Reggiano (at least 2 to 3 kilograms for a good hollow)
- Alternatively, a smaller wedge hollowed into a bowl shape works for smaller portions
For the Pasta
- 400 grams of pasta (rigatoni, spaghetti, tonnarelli, or pappardelle work best)
- Water for boiling (generously salted)
For the Sauce
- 150 grams of guanciale or pancetta (diced)
- 2 tablespoons of extra virgin olive oil
- 1 teaspoon of freshly cracked black pepper
- 100 milliliters of dry white wine
- 3 tablespoons of reserved pasta cooking water
- Salt to taste
Additionally, you may want to garnish the dish with extra grated Parmigiano-Reggiano and fresh herbs like parsley or basil. However, the dish is deeply flavorful on its own, so keep the extras simple.
The Equipment You Will Need
Having the right tools makes the process much easier. You do not need professional restaurant equipment. However, a few specific items will help you get the best results.
- A large pot for boiling pasta
- A wide, deep pan or skillet for making the sauce
- A sharp knife and a sturdy spoon for hollowing out the cheese wheel
- Long tongs or pasta forks for tossing the pasta
- A ladle for adding pasta water to the sauce
- A heat-safe surface or trivet to rest the cheese wheel on
The cheese wheel itself acts as both an ingredient and a serving vessel. Therefore, handle it carefully to avoid cracking or breaking it during preparation.
How to Prepare the Cheese Wheel
Preparing the cheese wheel is one of the most important steps. This is where the magic begins. Done properly, the wheel becomes a natural bowl that melts from the inside as you work the pasta.
Step 1: Warm the Cheese Wheel
Place the cheese wheel in a warm oven at around 80°C to 100°C (175°F to 210°F) for 15 to 20 minutes before you start cooking. This warms the interior without melting it completely. A warm wheel melts much more evenly when the hot pasta touches it. Additionally, warming the cheese removes excess moisture, which can otherwise dilute the sauce.
Step 2: Hollow Out the Wheel
Once the wheel is warm, carefully carve out the center using a sharp knife. Make a circular cut about 3 to 4 centimeters deep, leaving a thick wall of cheese around the edges. Use a sturdy spoon to scoop out the loose cheese from the center. Set the scooped-out cheese aside. You will use it to add extra richness to your sauce later.
Work slowly and with care. The wheel can be fragile when warm. Therefore, rest it on a stable, flat surface and use firm but controlled movements.
Step 3: Grate the Interior Surface
After hollowing, use the edge of your spoon or a grater to rough up the interior surface of the wheel. This creates more texture for the pasta to grip onto. A rougher surface also melts faster and more evenly. This simple step makes a big difference in the final result.
How to Cook the Pasta Perfectly
Perfect pasta is the foundation of this dish. Even the best cheese wheel cannot save overcooked or underseasoned pasta. Therefore, pay close attention during this stage.
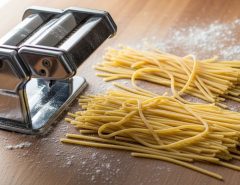
Choosing the Right Pasta Shape
Not all pasta shapes work equally well in a cheese wheel. You need a shape that holds onto the sauce and can be tossed easily inside the wheel. Rigatoni is an excellent choice because its ridged surface and hollow center catch the melted cheese beautifully. Spaghetti and tonnarelli also work well because they create a tangled nest that picks up a lot of sauce. Pappardelle, with its wide flat ribbons, is another great option for a more rustic feel.
However, avoid very small pasta shapes like orzo or ditalini. They are too small to toss properly and tend to fall out of the wheel.
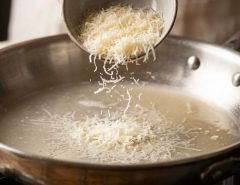
Cooking the Pasta Al Dente
Bring a large pot of water to a rolling boil. Add a generous amount of salt. The water should taste like the sea. Add your pasta and cook it for two minutes less than the time listed on the package. This is the al dente stage. The pasta will finish cooking inside the cheese wheel, so you need it slightly undercooked at this point.
Additionally, before draining the pasta, reserve at least one cup of the starchy pasta cooking water. This liquid is incredibly valuable. It helps the sauce bind together and adds a silky texture to the final dish. Therefore, do not skip this step.
How to Make the Sauce
The sauce for cheese wheel pasta is simple but deeply flavorful. It is designed to complement the richness of the cheese without overpowering it. There are several classic sauce options. However, a simple cacio e pepe style or a guanciale-based sauce are the most popular choices.
Making a Guanciale and Black Pepper Sauce
Start by placing your diced guanciale in a cold, wide pan. Turn the heat to medium. Allow the guanciale to render its fat slowly. This process takes about 5 to 7 minutes. The pieces will turn golden and crispy. Once they are done, remove them from the pan and set aside. Leave the rendered fat in the pan.
Add a generous amount of freshly cracked black pepper to the fat. Toast the pepper for about 30 seconds. This releases its aromatic oils and deepens the flavor. Next, pour in the white wine and let it reduce by half. The wine adds brightness and acidity to balance the richness of the cheese. Add a few tablespoons of the reserved pasta water to loosen the sauce. The sauce should be loose at this stage because it will thicken once it hits the cheese wheel.
Finishing the Sauce with Extra Cheese
Take the cheese you scooped out from the center of the wheel earlier. Grate or break it into small pieces. Add it to the warm sauce and stir gently over low heat until it melts in. This step builds the cheesy base of the sauce before it even reaches the wheel. Therefore, you get a double layer of cheese flavor in every bite.
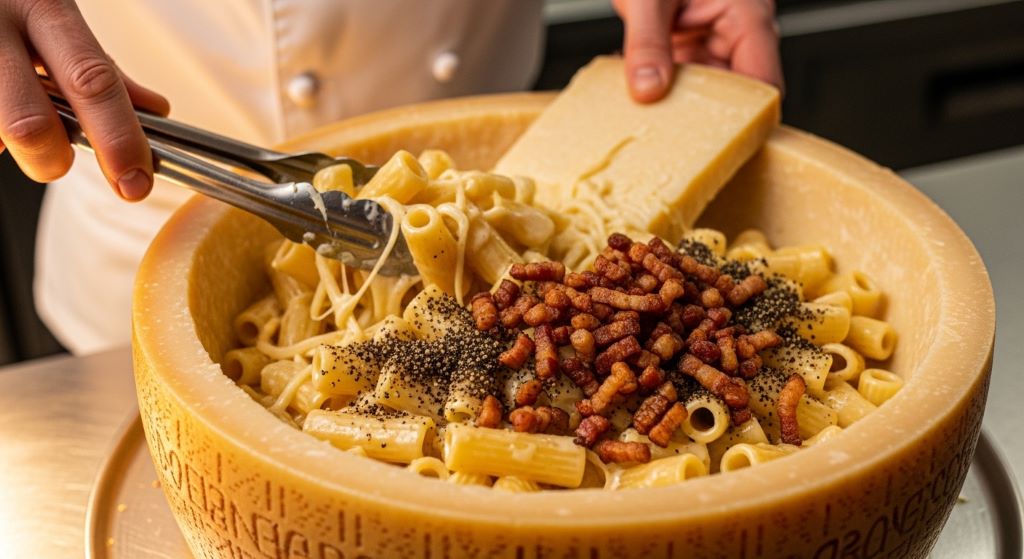
How to Toss the Pasta Inside the Cheese Wheel
This is the most exciting and theatrical part of the recipe. It is also the step that requires the most attention. The goal is to coat every piece of pasta in melted cheese while keeping the sauce creamy and smooth.
Timing Is Everything
The cheese wheel must be warm and the pasta must be hot when they meet. If either is too cold, the cheese will not melt properly. Therefore, plan your timing carefully. The pasta should go from the boiling water directly into the pan with the sauce, and then immediately into the cheese wheel.
The Tossing Technique
Drain the pasta and add it to the pan with your sauce. Toss quickly for about 30 seconds to combine. Then, transfer the pasta and sauce together into the hollowed cheese wheel. Use your tongs or pasta forks to toss the pasta vigorously inside the wheel. Work in a circular motion, pressing the pasta against the walls of the wheel as you toss.
The friction and heat will cause the cheese to melt and blend with the sauce. Add a small splash of reserved pasta water if the sauce looks too thick. Continue tossing for 2 to 3 minutes. The pasta should be glossy, well-coated, and slightly saucy. Return the crispy guanciale pieces to the pasta and give it one final toss.
Serving the Pasta
Serve the pasta immediately. Scoop it directly from the wheel onto warm plates. Finish each portion with a few extra shavings of Parmigiano-Reggiano and a crack of fresh black pepper. Additionally, bring the cheese wheel to the table to serve. The visual impact is part of the dining experience and your guests will love it.
Common Mistakes to Avoid
Even experienced cooks make mistakes with this dish. Here are the most common ones and how to avoid them.
- Using cold pasta water: Always use hot or warm pasta water. Cold water will seize the sauce and make it clumpy.
- Over-salting: Parmigiano-Reggiano is already quite salty. Therefore, taste your sauce before adding more salt.
- Working too slowly: Speed matters. The longer the pasta sits outside the wheel, the more it cools down, which means less melting. Work quickly and confidently.
- Cracking the cheese wheel: Do not use excessive force when hollowing. Warm the wheel first so it is pliable and easier to work with.
- Using low-quality cheese: Avoid pre-grated or processed Parmigiano. Always use a genuine, aged wheel for the best flavor and melt.
Tips to Cook Like a Restaurant Chef
Professional chefs have a few tricks that take this dish to the next level. Here are some of the best ones you can use at home.
- Season every layer: Salt the pasta water well, season the sauce, and taste as you go.
- Use a torch: Some chefs use a kitchen torch to lightly caramelize the inner walls of the cheese wheel before adding the pasta. This adds a nutty, toasted flavor.
- Keep the wheel on a low heat source: Placing the wheel on a very low electric burner or a fondue stand helps maintain the right temperature for continuous melting.
- Rest the pasta briefly: After tossing, let the pasta sit inside the wheel for 30 seconds before serving. This helps the sauce settle and thicken slightly.
- Invest in quality pasta: Artisan dried pasta made from durum wheat semolina holds up better inside the wheel and has a superior texture.
Conclusion
Cooking cheese wheel pasta at home is easier than it looks. The key is preparation. Choose a quality Parmigiano-Reggiano wheel, cook your pasta al dente, and time every step carefully. The technique of tossing the pasta inside the warm wheel is what sets this dish apart. It creates a sauce that is unlike anything you can achieve with a regular pan.
Additionally, the visual drama of the dish makes it perfect for entertaining. However, it is also satisfying enough to make on a quiet weeknight. By following the steps in this guide, you can recreate a restaurant-quality experience in your own home. Therefore, do not be intimidated. With a little practice, cheese wheel pasta will become one of your most impressive and favorite recipes.
Start with the right ingredients, follow each step with care, and enjoy the process. Great food is always worth the effort.
Frequently Asked Questions
1. What is the best type of pasta to use for cheese wheel pasta?
Rigatoni, spaghetti, and tonnarelli are the best choices. These shapes hold onto the melted cheese and sauce effectively. Rigatoni is especially popular because its ridged surface and hollow tube capture a lot of the cheese. However, any medium to large pasta shape with texture will work well in this dish.
2. Can I use a smaller piece of cheese instead of a full wheel?
Yes, you can. A large wedge of Parmigiano-Reggiano can be carved into a bowl shape and used the same way. It will not be as dramatic as a full wheel, but the flavor will be identical. Additionally, using a wedge is more practical and affordable for home cooks who are trying this dish for the first time.
3. How do I stop the cheese from getting too thick and clumping?
The key is to keep the pasta hot and to use plenty of reserved pasta water. Pasta water contains starch, which helps the sauce stay smooth and emulsified. Add it a little at a time while tossing. If the cheese starts to clump, add a splash of warm pasta water and toss vigorously. Speed and heat are your best tools against clumping.
4. Can I prepare the cheese wheel in advance?
You can warm and hollow the cheese wheel up to one hour before cooking. Keep it in a warm oven at a low temperature. However, do not fill it with pasta until you are ready to serve. The dish must be eaten immediately after tossing for the best texture and flavor. Therefore, time your sauce and pasta to be ready together right before serving.
5. Which cheese works best if I cannot find Parmigiano-Reggiano?
Pecorino Romano is the closest alternative. It has a similar firm texture and melts well under heat. However, it has a slightly saltier and sharper flavor. Grana Padano is another good option and tends to be more affordable. Avoid soft cheeses like brie or mozzarella, as they do not have the right structure or flavor profile for this dish.
Related Topics:
The Ultimate Guide to Global Pasta Flavors and Recipes
Pasta Without Borders: How Cultures Around the World Make It Their Own

Leave a Reply