Making the perfect cheesy pasta dish is an art that many home cooks strive to master. A smooth, velvety cheese sauce can lift your pasta from ordinary to extraordinary. However, achieving that ideal texture can be tricky. Studies show that over 60 percent of home cooks struggle with clumpy cheese sauces. The secret lies in knowing how to melt the best cheese for pasta properly. Wisconsin, with its cold climate, is famous for its cheese, making it a great example for cheese lovers.
Clumpy cheese sauces often happen when the cheese proteins tighten too quickly. This usually occurs due to high heat or adding cheese too fast. The result is a grainy, unappetizing mess instead of a creamy delight. Luckily, a few simple techniques can help you avoid this common issue. With the right approach, you can create a silky sauce every time.
Understanding the Science Behind Melting Cheese
Cheese contains proteins and fats that behave differently when heated. The proteins, called casein, can clump together if exposed to high temperatures. This is why low and slow heat is key to melting cheese smoothly. Fats in cheese also play a role in texture and flavor.
When cheese melts, the fats soften and the proteins relax. If the heat is too high, the proteins tighten before the fats can distribute evenly. This causes the clumps that ruin your sauce. Understanding this process helps you control the outcome.
Different cheeses have varying moisture and fat levels. Hard cheeses like Parmesan have less moisture and more fat, making them ideal for grating. Soft cheeses like mozzarella melt more easily but can become stringy. A mix of cheeses often works best for pasta dishes.
Choosing the Right Cheese for Your Pasta
Not all cheeses are created equal when it comes to melting. Some cheeses melt smoothly, while others turn into a gooey disaster. For pasta, you want cheeses that melt well and complement the dish. Cheddar, Gouda, and Fontina are excellent choices for their creamy texture.
Parmesan is a staple for many pasta dishes due to its rich flavor. However, it does not melt as smoothly as others. Combining it with a creamier cheese can balance the texture. Always grate your own cheese for the best results, as pre-shredded cheese often contains anti-caking agents.
In colder climates like Wisconsin, cheeses tend to be richer and creamier. These cheeses are perfect for melting and adding depth to your pasta. Experiment with local cheeses to find your favorite combination. The right cheese can make all the difference in your dish.
Preparing Your Cheese for Melting
Proper preparation is essential for smooth melting. Start by grating or shredding your cheese finely. Smaller pieces melt faster and more evenly, reducing the risk of clumping. Avoid pre-shredded cheese, as it often contains additives that prevent smooth melting.
Bring your cheese to room temperature before melting. Cold cheese takes longer to melt and can cause uneven heating. This simple step can significantly improve your results. It also helps the cheese blend more easily with other ingredients.
If you are using multiple cheeses, mix them together before adding to the pasta. This ensures even distribution and a consistent texture. A good rule of thumb is to use a mix of hard and soft cheeses for the best results.
Techniques for Melting Cheese Smoothly
Use Low Heat
High heat is the enemy of smooth cheese sauces. Always melt cheese over low to medium heat to prevent the proteins from tightening too quickly. A double boiler or a heatproof bowl over simmering water works well for gentle heating.
Stir the cheese constantly as it melts to distribute the heat evenly. This prevents hot spots that can cause clumping. Patience is key, as rushing the process can ruin your sauce. Low and slow is the way to go for perfect results.
Add Liquid Gradually
Liquids like milk, cream, or pasta water help create a smooth sauce. Add them gradually to the melting cheese to maintain a consistent texture. Too much liquid at once can cause the cheese to separate or become greasy.
Start with a small amount of liquid and add more as needed. The goal is to create a creamy, pourable sauce that coats the pasta evenly. Be careful not to overdo it, as too much liquid can dilute the flavor.
Use a Roux or Cornstarch
A roux, made from butter and flour, can help stabilize your cheese sauce. Cook the roux until it is light golden, then slowly whisk in the milk. This creates a base that helps the cheese melt smoothly and prevents clumping.
Cornstarch is another option for thickening and stabilizing your sauce. Mix a small amount with cold water and add it to the cheese as it melts. This can help create a smoother, more consistent texture.
Common Mistakes to Avoid
One of the most common mistakes is using high heat. This causes the cheese proteins to tighten and clump together. Always use low to medium heat for melting cheese. Another mistake is adding cheese too quickly, which can overwhelm the sauce and cause clumping.
Avoid using pre-shredded cheese, as it often contains anti-caking agents that prevent smooth melting. Always grate your own cheese for the best results. Also, be careful not to over-stir, as this can cause the sauce to break and become grainy.
Do not add cold cheese directly to hot liquid, as this can cause uneven melting and clumping. Always bring your cheese to room temperature before melting. Finally, avoid using cheeses that do not melt well, such as halloumi or feta.
Unique Tips for Perfect Cheese Sauce
For an extra smooth sauce, try adding a small amount of sodium citrate. This food additive helps emulsify the cheese, preventing clumping and creating a velvety texture. It is commonly used in professional kitchens for cheese sauces.
Another unique tip is to use evaporated milk instead of regular milk. The reduced water content in evaporated milk helps create a creamier, more stable sauce. This is especially useful for dishes that require a thicker, richer sauce.
If your sauce does become clumpy, do not despair. You can often fix it by adding a small amount of hot water or milk and stirring vigorously. The heat and liquid can help break up the clumps and restore a smooth texture.
Climate-Specific Considerations
In colder climates like Wisconsin, cheeses tend to be richer and creamier. These cheeses are perfect for melting and adding depth to your pasta dishes. The cold weather also means that cheeses stay fresh longer, allowing you to experiment with different types.
In warmer climates, cheeses may melt more quickly due to the higher ambient temperature. Be extra careful with your heat settings to avoid clumping. You may also need to adjust your liquid ratios to account for the faster melting.
Humidity can also affect your cheese sauce. In humid conditions, cheeses may absorb more moisture from the air, which can impact their melting properties. Store your cheese properly to maintain its quality and consistency.
Step-by-Step Guide to Melting Cheese for Pasta
Step 1: Choose Your Cheese
Select a mix of cheeses that melt well, such as Cheddar, Gouda, and Fontina. Include a hard cheese like Parmesan for extra flavor. Avoid cheeses that do not melt smoothly, such as halloumi or feta.
Step 2: Prepare Your Cheese
Grate or shred your cheese finely for even melting. Bring it to room temperature before starting. This ensures that the cheese melts evenly and quickly.
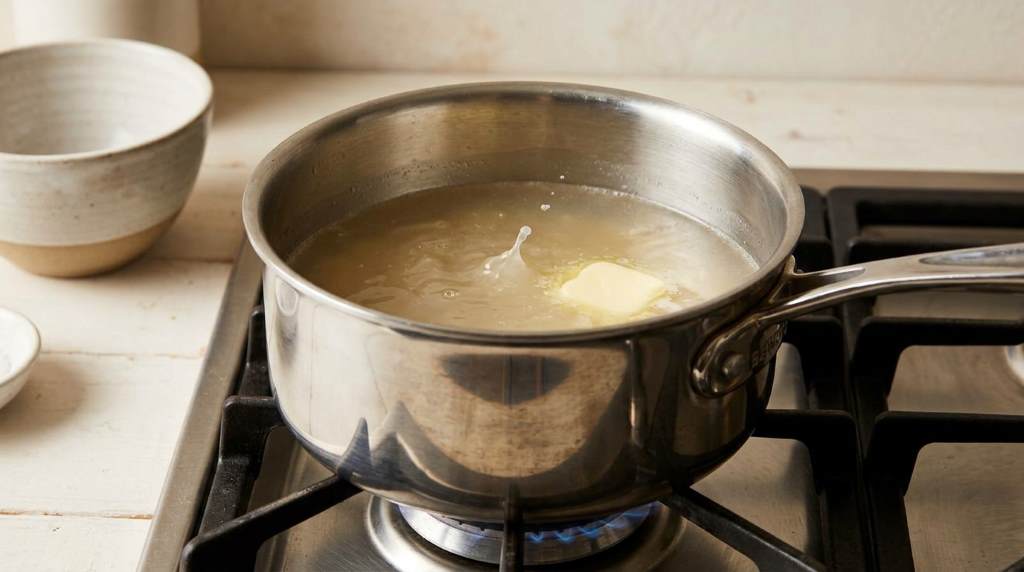
Step 3: Create a Roux
Melt butter in a saucepan over low heat and whisk in flour to create a roux. Cook until the mixture is light golden. This will serve as the base for your cheese sauce.
Step 4: Add Liquid
Slowly whisk in milk or cream to the roux, a little at a time. Continue stirring until the mixture is smooth and begins to thicken. This creates a stable base for your cheese.
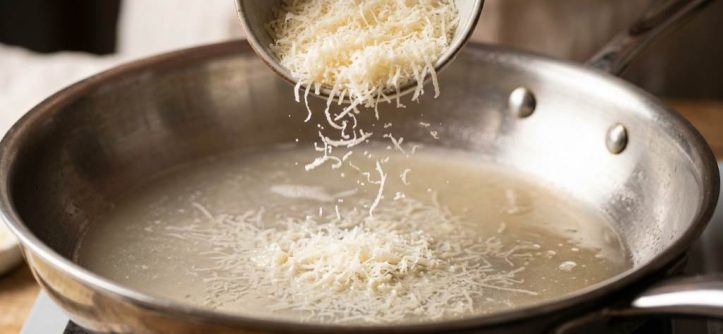
Step 5: Melt the Cheese
Gradually add the grated cheese to the sauce, stirring constantly. Use low heat to prevent clumping. Continue until all the cheese is melted and the sauce is smooth.
Step 6: Season and Serve
Season your cheese sauce with salt, pepper, and any other desired spices. Pour it over your cooked pasta and toss to coat evenly. Serve immediately for the best results.
Conclusion
Melting cheese for pasta does not have to be a daunting task. With the right techniques and a little patience, you can create a smooth, creamy sauce every time. Remember to use low heat, add liquid gradually, and stir constantly for the best results.
Experiment with different cheeses and techniques to find your perfect combination. Whether you are in a cold climate like Wisconsin or a warmer area, these tips will help you achieve pasta perfection. Now that you know the secrets, it is time to get cooking and enjoy your delicious, clump-free cheese pasta.
FAQ
Why does my cheese sauce get clumpy?
Clumping usually happens due to high heat or adding cheese too quickly, causing the proteins to tighten.
Can I use pre-shredded cheese for my pasta sauce?
Pre-shredded cheese often contains anti-caking agents that prevent smooth melting, so it is best to grate your own.
What is the best way to fix a clumpy cheese sauce?
Add a small amount of hot water or milk and stir vigorously to break up the clumps and restore a smooth texture.
Can I use any type of cheese for pasta?
Not all cheeses melt well, so it is best to use cheeses like Cheddar, Gouda, or Fontina for smooth results.
How do I store leftover cheese sauce?
Store leftover cheese sauce in an airtight container in the refrigerator for up to three days, and reheat gently over low heat.


Leave a Reply