
Tired of bland, store-bought pasta that lacks that certain je ne sais quoi? Imagine silken strands of tagliatelle, perfectly formed ravioli, or delicate orecchiette, all crafted by your own hands, right in your kitchen. The thought of making pasta from scratch might conjure images of flour-dusted countertops and endless kneading, but what if we told you there’s a simple, enjoyable way to achieve restaurant-quality homemade pasta without the culinary acrobatics?
Enter the pasta maker. This unassuming kitchen gadget is your secret weapon to unlocking a world of fresh, flavorful, and incredibly satisfying pasta dishes. Forget the notion that homemade pasta is reserved for professional chefs or Italian grandmothers. With a little guidance and the right tools, you too can transform simple ingredients into edible works of art.
This comprehensive guide will demystify the process of making homemade pasta with a pasta maker, from choosing the perfect machine to mastering various pasta shapes. We’ll answer your burning questions, provide practical tips, and inspire you to embark on a delicious culinary adventure that will undoubtedly elevate your everyday meals. Get ready to impress your family and friends with pasta that tastes as good as it looks – because nothing beats the taste of truly fresh, homemade pasta.
Why Bother with Homemade Pasta? The Unbeatable Difference
Before we dive into the mechanics, let’s address the fundamental question: why go to the “trouble” of making pasta at home when countless dried varieties line supermarket shelves? The answer lies in the unparalleled difference in taste, texture, and freshness.
- Superior Flavor: Fresh pasta possesses a nuanced, rich flavor that dried pasta simply cannot replicate. The eggs (if used) and fresh flour create a depth of taste that elevates any sauce it’s paired with.
- Ideal Texture: Homemade pasta boasts a delightful chewiness and elasticity. It’s tender yet firm, providing a satisfying mouthfeel that perfectly absorbs and cradles your sauces. Dried pasta, while convenient, often lacks this vibrant texture.
- Customization is Key: When you make pasta from scratch, you’re in control. Want to add herbs to your dough? Go for it! Craving spinach pasta for a vibrant green hue? Easy! The possibilities for flavor and color variations are endless.
- No Preservatives or Additives: You know exactly what’s going into your pasta – simple, wholesome ingredients. This is a significant advantage for those with dietary concerns or who prefer to avoid artificial additives.
- A Rewarding Culinary Experience: There’s an immense sense of accomplishment and joy in creating something delicious from scratch. Making pasta can be a therapeutic and enjoyable activity, especially when shared with loved ones.
Choosing Your Pasta Partner: Manual vs. Electric Pasta Makers
The first step on your homemade pasta journey is selecting the right pasta maker. Broadly, these fall into two categories: manual and electric. Each has its own set of advantages and considerations.
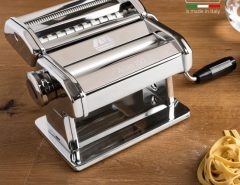
Manual Pasta Makers: The Traditionalist’s Choice
Manual pasta makers are the classic, hand-cranked machines that have graced Italian kitchens for generations. They typically consist of a sturdy base, a set of rollers for flattening the dough, and various cutting attachments for different pasta shapes.
Pros:
- Affordable: Manual pasta makers are generally more budget-friendly, making them an excellent entry point for beginners.
- Durable: Made with robust materials like stainless steel, these machines are built to last.
- Quiet Operation: No motor means no noise, allowing for a more peaceful pasta-making experience.
- Control: You have complete control over the speed and thickness of your pasta.
Cons:
- Requires Manual Effort: You’ll need to crank the handle, which can be tiring for large batches.
- Two-Handed Operation: You’ll often need one hand to feed the dough and another to crank, which can be a bit awkward initially.
Ideal For: Home cooks who enjoy a hands-on approach, those on a budget, and kitchens with limited counter space.

Electric Pasta Makers: The Modern Convenience
Electric pasta makers, often referred to as automatic pasta makers, take much of the manual labor out of the process. Many models can mix, knead, and extrude pasta with the push of a button.
Pros:
- Effortless: The machine does most of the work, saving you time and effort.
- Faster Production: Ideal for making larger quantities of pasta quickly.
- Consistency: Electric models can produce very consistent pasta thickness and shape.
- Versatility: Many come with a wider range of dies for various pasta shapes, including unique ones like rigatoni or macaroni.
Cons:
- Higher Price Tag: Electric pasta makers are significantly more expensive than manual ones.
- Can Be Noisy: The motor can generate some noise during operation.
- Larger Footprint: They tend to be bulkier and require more storage space.
Ideal For: Busy individuals, those who make pasta frequently, or anyone who prefers a hands-off approach and doesn’t mind a larger investment.
The Art of the Dough: Perfecting Your Pasta Base
Regardless of your chosen pasta maker, the foundation of excellent homemade pasta lies in the dough. A simple pasta dough typically consists of just a few ingredients, but their quality and proper handling are paramount.
Basic Egg Pasta Dough Recipe:
- 200g (about 1 ½ cups) “00” flour (or all-purpose flour for a slightly chewier texture)
- 2 large eggs
- Pinch of salt
- Optional: 1 tbsp water or olive oil (if needed for consistency)
Instructions for Dough Preparation:
- Mound Method (Traditional): On a clean work surface, create a mound with the flour. Make a well in the center and crack the eggs into it. Add the salt.
- Mix Gradually: Using a fork, gently whisk the eggs, gradually incorporating flour from the inner walls of the well. Continue until a shaggy dough forms.
- Knead with Passion: Once the dough comes together, begin kneading by hand. This is a crucial step! Knead for 8-10 minutes, pushing the dough away from you with the heels of your hands and then folding it back. The dough should become smooth, elastic, and slightly firm.
- Rest is Best: Form the kneaded dough into a ball, cover it tightly with plastic wrap, and let it rest at room temperature for at least 30 minutes (or up to an hour). This allows the gluten to relax, making the dough easier to roll.
Pro-Tips for Perfect Dough:
- Flour Choice: “00” flour is finely milled and low in protein, resulting in a very tender pasta. All-purpose flour works well too, producing a slightly firmer chew.
- Humidity Matters: The amount of liquid needed can vary based on the humidity in your kitchen. If your dough is too dry, add a few drops of water or olive oil. If too sticky, add a little more flour.
- Don’t Over-Flour: Use flour sparingly when rolling out the dough. Too much flour will make the pasta dry and brittle.
- Listen to Your Dough: It should feel soft, pliable, and elastic, but not sticky.
Through the Rollers: Shaping Your Masterpiece
Once your dough has rested, it’s time for the magic to happen with your pasta maker.
Steps for Using a Manual Pasta Maker:
- Divide and Flatten: Divide your dough into smaller, manageable portions. Flatten each portion into a rough rectangle with your hands or a rolling pin.
- Start Thick: Set your pasta maker rollers to the widest setting. Feed one piece of dough through the rollers.
- Fold and Repeat: Fold the dough into thirds (like a letter) and feed it through the widest setting again. Repeat this 5-6 times. This step helps to further knead the dough and make it smooth.
- Gradually Thin: Begin decreasing the roller setting by one notch at a time. Pass the dough through each setting until you reach your desired thickness. For most pasta shapes, this will be around setting 6 or 7 on a typical machine.
- Cut Your Shape: Once you have a long, thin sheet of pasta, attach the desired cutting attachment (e.g., tagliatelle, fettuccine, spaghetti). Feed the pasta sheet through the cutter.
Steps for Using an Electric Pasta Maker:
- Add Ingredients: Follow your machine’s instructions for adding flour and liquid. Many electric pasta makers have built-in scales for precise measurements.
- Mix and Knead: Select the appropriate program for mixing and kneading. The machine will do the work for you.
- Extrude: Once the dough is ready, the machine will begin extruding the pasta through the chosen die. Cut the pasta to your desired length as it emerges.
Common Pasta Shapes to Explore:
- Fettuccine: Flat, wide ribbons, perfect for rich cream sauces like Alfredo.
- Tagliatelle: Slightly narrower than fettuccine, also excellent with hearty meat sauces.
- Spaghetti: Classic long, round strands, ideal for marinara or carbonara.
- Linguine: Flat and slightly wider than spaghetti, great for seafood sauces.
- Lasagne Sheets: Wide, flat sheets for layering in baked dishes.
- Ravioli/Tortellini: Stuffed pasta, requiring a bit more effort but incredibly rewarding. You’ll use your pasta sheets and then fill and seal them.
Cooking Your Freshly Made Pasta
Cooking fresh pasta is quicker than cooking dried pasta. It typically takes only 2-4 minutes, depending on the thickness and your desired al dente doneness.
- Bring Water to a Rolling Boil: Use a large pot and generously salt the water.
- Add Pasta: Gently add the fresh pasta to the boiling water. Don’t overcrowd the pot.
- Stir Gently: Stir immediately to prevent sticking.
- Cook to Al Dente: Cook until the pasta is al dente (firm to the bite). Taste a strand to check for doneness.
- Drain and Serve: Drain the pasta immediately and toss with your favorite sauce.
Storing Your Homemade Creations
While fresh pasta is best enjoyed immediately, you can store it for later use.
- Refrigeration: Dust lightly with semolina flour or cornmeal to prevent sticking, then loosely coil into nests. Store in an airtight container in the refrigerator for 2-3 days.
- Freezing: Dust well with flour, then arrange in a single layer on a baking sheet. Freeze until solid. Transfer the frozen pasta to a freezer-safe bag and store for up to 1 month. Cook directly from frozen, adding a minute or two to the cooking time.
- Drying: For longer storage, you can air-dry your pasta. Hang it on a pasta drying rack or lay it flat on a clean, floured surface, turning occasionally, until completely brittle. This can take 12-24 hours. Store dried pasta in an airtight container for several months.
Read More Also: Why Your Kitchen Needs a Pasta Maker Today
FAQs: Your Homemade Pasta Questions Answered
Q1: What’s the best type of flour for homemade pasta?
A1: “00” flour is considered the gold standard for its fine texture and low protein content, resulting in tender pasta. However, all-purpose flour works very well and is more readily available.
Q2: My pasta dough is too sticky/dry. What should I do?
A2: If too sticky, add a little more flour, one tablespoon at a time, until it reaches the right consistency. If too dry, add a few drops of water or olive oil until it comes together. Humidity plays a big role!
Q3: Do I need to rest the pasta dough?
A3: Yes, resting the dough is crucial. It allows the gluten to relax, making the dough much easier to roll and preventing it from shrinking back. Aim for at least 30 minutes.
Q4: Can I make pasta without eggs?
A4: Absolutely! Eggless pasta (pasta di semola) is traditional in Southern Italy and typically uses just semolina flour and water. It produces a firmer, chewier pasta.
Q5: How long does homemade pasta take to cook?
A5: Fresh pasta cooks much faster than dried pasta. Depending on thickness, it typically takes only 2-4 minutes to reach al dente.
Q6: How can I prevent my pasta from sticking together?
A6: Ensure you lightly flour your pasta sheets and cut strands with semolina flour or cornmeal. Also, when cooking, use a large pot of generously salted boiling water and don’t overcrowd the pot. Stir immediately after adding the pasta.
Q7: Is it worth buying an expensive pasta maker?
A7: It depends on your needs. For occasional use, a good quality manual pasta maker is excellent. If you plan to make pasta frequently or in large batches, an electric pasta maker might be a worthwhile investment for its convenience.
Q8: Can I add flavor to my pasta dough?
A8: Yes! You can incorporate ingredients like spinach puree, beet juice, tomato paste, or herbs into your dough for vibrant colors and subtle flavors. Just be mindful of the liquid content.
Read More Also: Cleaning and Maintaining Your Pasta Maker the Right Way
Ready to Roll? Your Pasta-Making Journey Awaits!
Making homemade pasta using a pasta maker is an incredibly rewarding culinary endeavor. It’s a journey that transforms simple ingredients into extraordinary meals, bringing a touch of authentic Italian tradition right to your dining table. From the tactile pleasure of kneading the dough to the satisfying sight of perfectly cut strands, every step is a testament to the joy of cooking from scratch.
So, why wait? Dust off that pasta maker (or consider investing in one!), gather your ingredients, and prepare to embark on a delicious adventure. Your taste buds, and your family and friends, will thank you.
Don’t just dream of delicious pasta, make it a reality! Share your homemade pasta creations with us in the comments below. What’s your favorite pasta shape to make? What sauce do you love to pair with it? Let’s inspire each other to roll, cut, and savor the magic of fresh, homemade pasta!

Leave a Reply